To enter historical A/P data into PERFECT FIT, you will need the following:
– A financial “PERFECT FIT Start Date”
– A List of all open Payables as of the Start Date.
– A Trial Balance Report from your previous system as of the day before the Start Date. (Optional)
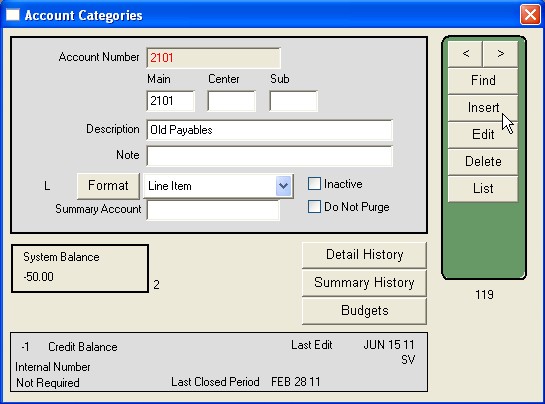
1. Insert a GL Account number 2101 via Menus > Ledger and click Insert. Name the account Old Payables
 .
.
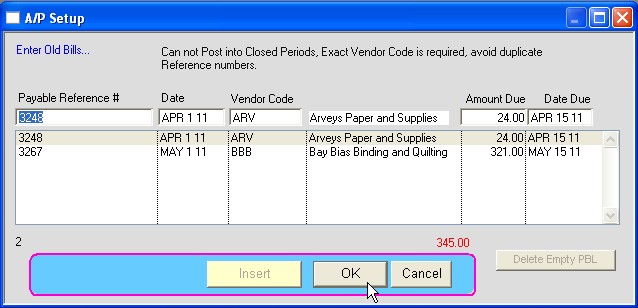
2. Insert a Payable for each open payable on your list via Menus > Maintenance > Utilities > A/P Setup. Click Insert and you will be prompted for an offset account, use 2101. In the A/P Setup window enter the Payable Reference number, the Payable Date (use the actual payable date), Amount Due, and Date Due. To insert additional line items tab through to the next available line. When finished press OK. Once the payables have been inserted you will be prompted to post the payables. If you want to post the payables click Yes, otherwise click No to post them at a later date.

3. When done, run a Payable Aging report to confirm that the payables entered in PERFECT FIT agree with your payables list and the amount on the Trial Balance. Payable Aging reports are accessed via Menus > Checks/Payables > Reports > Payables, Aging.
4. When you enter the Trial Balance into PERFECT FIT, make sure that the offset account for the A/P entry is 2101. Use GL > Enter Transactions.
5. After all old A/P is entered, close Periods up to the Start Date.
A few notes:
-The list of open payables from your old system must agree with the AP amount on the Trial Balance from your old system.
-When posting a payable in PERFECT FIT, the “hidden” offset account is 2100.
-After entering the Trial Balance AP amount, the debits and credits on account 2101 will cancel each other out for a net balance of zero. At that point all A/P will show on Account 2100.
-You can use other GL Numbers if you like, but the internal posting account for AP is always 2100.
Copyright © AS Systems, All Rights Reserved | WordPress Development by WEBDOGS